General Topics: Architecture, Circuits, Design, Electronics, Engineering. Geometry, Physics
Grade Level: 6-8
Over the course of 12 weeks (from April 6th through June 22nd), SPARKmakers led a “thinkering” workshop titled Designing Playful Structures, Simple Machines, and Electronic Gadgets at Mercy Neighborhood Ministry of Philadelphia and in partnership with the Internship Program from William Penn Charter School.
The workshop introduced middle school students to basic design and technical problem-solving skills, as well as relatively complex systems and concepts relating to design, math, engineering, physics and technology. Week by week we added one or a few concepts in combination until the end of the workshop, by which point the students learned to make five super fun things.
 The first few classes of the workshop involved learning how to apply geometry and design principles by building 3-Dimensional objects, and so in groups, we figured out How to Make Geodesic Domes.
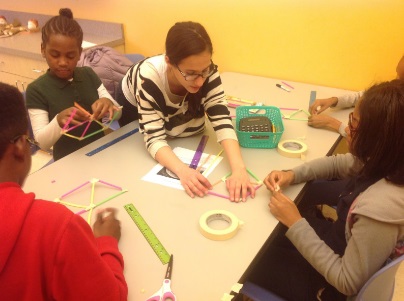
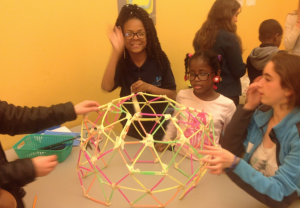
Each group was given a bag of plastic straws, a roll of masking tape, scissors, and a picture of a geodesic dome. We then explained to the students how to make triangles from the straws and tape, and then how to add other triangles to those triangles to make hexagons. After that, the students were given free reign to decide how to continue. The process involved students to come up with a geodesic dome based on a picture and discern how it is constructed. Occasionally we had to remind the students that everyone in the group needed to participate, but we did so in a way that promoted teamwork, suggesting that every students can help in a way that suited their level of creativity. The result was fascinating. Each group ended with a variety of solutions.
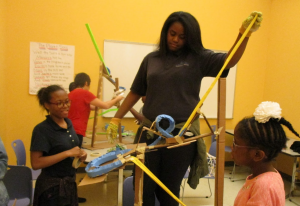 Following that activity, we thinker our way into How to Make Marble Ramps with a Roller Coaster. Central to our approach was for students to learn: how to continue to work in groups; how to plan a design and build it with cardboard and papers; and to observe how kinetic energy works. We learned how gravity, acceleration and momentum affect the marble to move depending on the shapes, angles and sizes of the ramps.
In order to do this activity, we broke up the activity into smaller, design and problem-solving activities in order to introduce students to a set of new skills. These skills aimed to help them to grasp each piece of the whole project, rather than getting lost and losing interest. Each group of students were given a cardboard base to start, extra cardboard to build their towers to give the ramp its height, scissors to cut the cardboard, stencils to base curves from, construction paper to make their ramps, and tape and hot glue to hold it all together. We also delegated tasks within each group so that each member was doing something suited to their abilities. Because there was no one way to build these ramps, each group had to get creative: do we want a zig-zag slide, do we want a loop-de-loop? The results were remarkably fun!
 For the third activity, each student learned to assemble their own custom-made Motorized Car that has an electronic H-bridge controller, a motor and two gears. The H-bridge required knowledge of basic electronics and soldering, which we gave the students a crash-course in.
The first part of the crash-course involved learning concepts behind circuitry and how we were applying it, and started assembling the H-bridge circuit. While building the H-bridge, they learned the basic rules for how electric circuits works and why electricity moves in a circuit. Also they learned that in order for their cars to work, the circuitry had to be exact or else the car would not operate.
We then assembled the bodies of the cars. This included assembling the axles out of pencils and straws and attaching the laser-cut wheels and one gear, then attaching them to the cardboard chassis. Finally, once we finished the controller and the car, we attached the motor to the back wheel with the gear, and we tested them out and observed for any issues. The students realized that in order for the car to work, the motor had to be placed in a specific way to move the wheels consistently. After thinkering for a little while, they found a solution and voila! The car was moving!
For our last activity, we built two projects: Rotary Wings, and a Mini Electric Fan with a simple circuit.
We paired these two projects together because they are both relatively short, simple, and use similar principles that the students can relate to each other.
The Rotary Wings component of the project teaches how helicopters and airplanes are able to fly, getting as in depth as explaining Bernoulli’s Principle. It also allows the students to tinker with the angles of the wings to see what position is best for flight. At first, some students attempted to glue the wings on flat or sideways, and figured out that these positions did not allow for flight at all, and were forced to start over using different angles.
The Mini Electric Fan is a good introduction to basic electronics because it has an easy to understand layout (both design and circuitry). The circuitry involved connecting a battery to a motor with a battery holder and adding a paper clip between the red wires which functions as a switch; and all of these parts are mounted in a cardboard piece.
Then the students made a propeller out of card stock which, was then cut into a long oval blade and hot glued to the moving part (axles) of the motor. We then let them tinker with this problem for little while. After observation, they realized that without the blades being bent, the fan created no air flow (no propulsion), and only once the blades were bent (depending on the direction and angle) did the fans push air inward or outward.
Because the circuitry in the Mini Electric Fan was so simple, when the circuit was properly assembled the outcome was easy to understand (ie the fan moved). If there were any issues, they were easy to identify, explain, and rectify. In thinkering on how this is put together, students were able to learn and understand how circuitry in series and conductivity works, as well as how electric energy is stored in a battery and used to power electrical devices such as the motor. And similarly to the rotary wings, the mini fan was another way to intuitively understand the intrinsic forces at play in air dynamics.